Deploying an ember-cli application to Amazon S3
In this article we’re going to deploy an Ember app to Amazon S3, we’ll be using ember-deploy, ember-deploy-s3 and ember-deploy-s3-index (disclaimer: I wrote the last one). If you haven’t read about the idea of ‘Lightning Fast Deploys’ I’d recommend doing so as it’s the idea behind ember-deploy. Let’s get stuck in.
1) Sign up to Amazon’S AWS if you aren’t already a member.
2) Log in to the console and click services -> S3. From here you can manage all of your buckets and so on. There are also desktop clients you can download or you could communicate via an API only.
3) We’re going to make two buckets. One for managing our assets, and one for managing our index.html revisions. Click Create Bucket and follow the instructions. One thing to note is that if you intend to serve your Ember app directly from the bucket and use a custom domain, your bucket must be named the same as the domain (minus the www), you’ll also need a second bucket with the addition of www and this will serve to redirect only. Amazon have thorough instructions. What we’re taking advantage of is Amazon’s ‘Static Website Hosting`. If you intend for the bucket to act as a storage mechanism only — call it anything you like!
4) Great, so we now have two buckets. We’ll also need a user that can access and manipulate these buckets. We’ll use that users’ credentials (accessKeyId and secretAccessKey) to authenticate via ember-deploy. Click services -> IAM -> Create New Users and create a user. You could just use your root user but it’s nice to keep things separated. Make sure Generate an access key for each user is ticked. You’ll now be presented with a screen where you can view your secret credentials, make sure you do and take a note of them, you won’t be able to view them again (it’s not the end of the world if you don’t, you’ll just need to create another set of keys).
5) We’ll now assign an IAM policy to the user so that they have the rights to manipulate our bucket. Click your user in the IAM panel, and then click inline policies. You should see There are no inline policies to show. To create one, click here., click and then choose Custom Policy, give it a name and put the following in the Policy Document section:
{
  "Statement": [
    {
      "Action": "s3:*",
      "Effect": "Allow",
      "Resource": [
        "arn:aws:s3:::<ASSETS BUCKET NAME>",
        "arn:aws:s3:::<ASSETS BUCKET NAME>/*",
        "arn:aws:s3:::<INDEX BUCKET NAME>",
        "arn:aws:s3:::<INDEX BUCKET NAME>/*"
      ]
    }
  ]
}
Hit Apply Policy
6) Now head back to the S3 panel. We’re going to add a bucket policy to our buckets to allow the files to be served publicly. Right click your bucket -> properties -> permissions -> Add bucket policy. Paste the following in:
{
	"Statement": [
		{
			"Sid": "AllowPublicRead",
			"Effect": "Allow",
			"Principal": {
				"AWS": "*"
			},
			"Action": "s3:GetObject",
			"Resource": "arn:aws:s3:::<BUCKET NAME>/*"
		}
	]
}
And click save.
7) Our AWS resources should now be setup and configured. Let’s create an Ember app and get it deployed.
8) Generate an Ember app with ember new <app-name>
9) Install all necessary dependencies:
npm install ember-deploy
npm install ember-deploy-s3
npm install ember-deploy-s3-index
10) Create a deploy.json file in the root of your project
11) Fill out your credentials (add a block for each environment):
{
  "development": {
    "store": {
      "type": "S3",
      "accessKeyId": "<key>",
      "secretAccessKey": "<key>",
      "bucket": "<index bucket>"
    },

    "assets": {
      "type": "s3",
      "accessKeyId": "<key>",
      "secretAccessKey": "<key>",
      "bucket": "<assets bucket>"
    }
  }
}
12) Open up your Brocfile.js file and add the following:
var app = new EmberApp({
  fingerprint: {
    prepend: '<YOUR ASSET BUCKET URL>'
  }
});
This is really important, without this the asset URLs that are generated will be relative, whereas we want them to point to our bucket. Your asset bucket URL will look something like this depending on region: //<BUCKET NAME>.s3.amazonaws.com/. Remember the forward-slash as you’ll end up with things wrongly concatenated if you don’t.
13) Make a change to your project, for the sake of this tutorial I’m just going to put a custom <title> in my index.html file.
14) Commit those changes
15) Deploy those changes with ember deploy, this will deploy your assets and your index file revision. ember deploy will also perform an ember build using production level settings for things like asset url prepending (unless you specify otherwise). The revision number is based on commit SHAs by default.
16) We can run ember deploy:list to see all revisions
17) Lets activate a revision by running ember deploy:activate --revision <REVISION>
18) An index.html file will either be created with the contents of the revision or updated to match. Now you can either serve your index.html file directly from your bucket (using Amazon’s static site hosting mode), or merely use this as a storage mechanism for your server to query.
19) We’ll assume that you wanted to serve the app directly, and enable Static Site Hosting. Head back to the S3 panel in the AWS console. Right click your index bucket and click properties. Now you want to match the settings seen here:
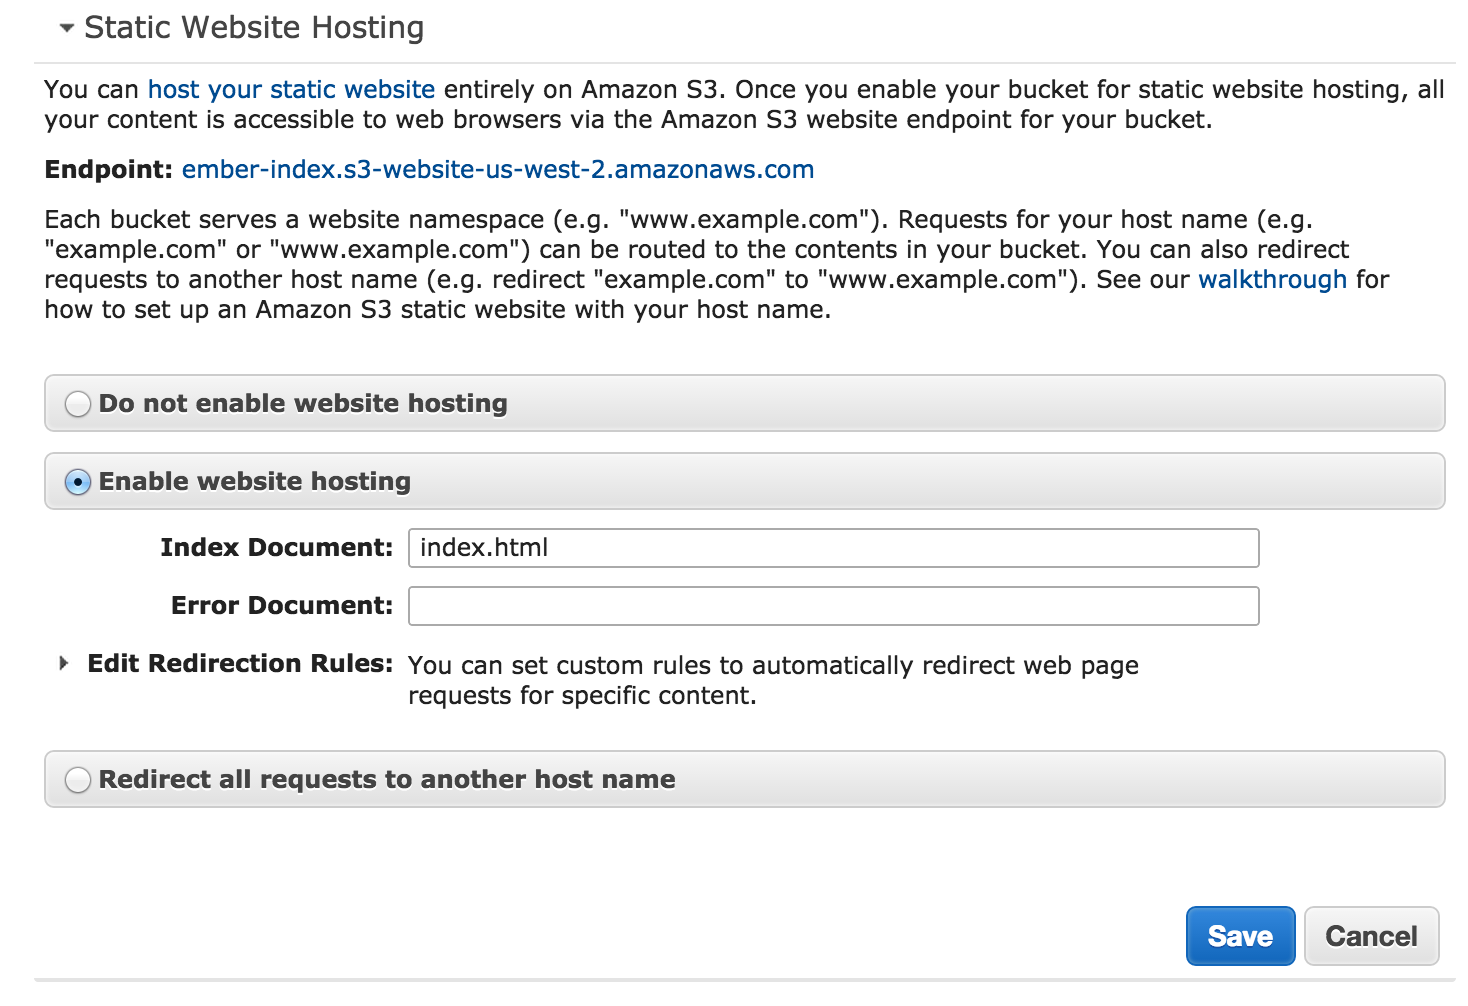
Click save
20) Head on over to the URL provided as endpoint. You’ll see your Ember app! The specified revision is being served as your index.html file, and if you view source you’ll see your generated absolute URLs pointing to your assets bucket. You can go on to configure your custom domain from here, but that is out of the scope of this tutorial.
21) Would you like to serve your app directly from your bucket (no middle-man server) and have preview capabilities? Then this step is also necessary. We can’t serve previews directly from our index bucket as URLs like this: <BUCKET URL>.com/<REVISION>.html would break Ember’s router. Whilst it would be nice to specify multiple possible index files to S3’s Static Site Hosting options, this isn’t possible. And messing with Ember’s rootUrl is a terrible idea for this purpose. So what we’ll do instead is setup a third bucket - it’s okay this bucket will use all of the same setup as before, just copy and paste your policies and amend the IAM policy to have an extra bucket. You can think of this as your staging bucket. You can amend your deploy.json file like so:
"staging": {
    "store": {
      "type": "S3",
      "accessKeyId": "<KEY>",
      "secretAccessKey": "<KEY>",
      "bucket": "<BUCKET>"
    }
  }
There’s no need for an assets block in here as we’ll just be using ember deploy:index with an environment passed in.
22) Let’s make some changes. And commit them.
23) We can run ember deploy --environment production to do an initial deploy. We store our assets and a revision in our production buckets (note: in earlier commands passing no environment would have used whatever you defined as development). First though we want to give this a thorough test on staging. Maybe send internally to team members? Possibly a client?. Run ember deploy:index --environment staging.
24) To preview this you have two options, they’re functionally identical but allow flexibility. You can activate the revision with ember deploy:activate --revision <REVISION> --environment staging, and just keep your preview bucket’s static site hosting index document option set to index.html or you can omit the activation stage and change the index document option to match the revision itself, so it’ll be served directly:

25) Once everyone is happy activate the same revision in production: ember deploy:activate --revision <REVISION> --environment production. Grab a cup of tea and a slice of cake, because you’re done.
Whilst the extra bucket may seem overly complicated it’s all kept simple with environments. We also keep the flexibility of a variety of use cases, to clarify they are:
-
Serving directly from bucket with revisions but no previewing: assets bucket and index bucket
-
Serving directly from bucket with revisions and previews: assets bucket, index bucket and index previews bucket
-
Serving from a backend server using the bucket as storage only, ability to use revisions and previews based on how you query the bucket: assets bucket and index bucket
There’s absolutely no need here to have a backend server setup if you don’t need one. Or maybe you do but two completely different teams work on the front and back ends, communicating only over an API. Who knows! The ways apps are being built and consumed now are pretty endless.
This writing has kindly been sponsored by Pootsbook and Ember Watch.
I want to read more articles like this: